Self-host listmonk
Newsletters and mailing lists on your own VM. A Mailchimp alternative.
Shelley handles the setup. About 15 minutes.
Prefer a terminal?
curl -fsSL https://exe-staging.dev/deploy/listmonk/prompt.txt | ssh exe.dev new --prompt=/dev/stdinlistmonk is a newsletter and mailing-list manager: lists, double opt-in, campaigns with templates and analytics, a subscriber API, and transactional mail, all in one Go binary on PostgreSQL. It sends through any SMTP server, so the mail itself goes out through a provider like Amazon SES, Postmark or Resend, and your subscriber list stays in your own database.
An exe.dev VM is a good home for it. The admin sits on port 9000, which
only you and the people you share the VM with can open.
The main address, https://my-listmonk.exe.xyz/, answers only what
subscribers and your provider need: signup and opt-in pages, unsubscribe
links, the archive, tracking and bounce webhooks. Until you connect a
provider, every email lands in a private test inbox, so nothing reaches a
real person by accident.
What you get#
- listmonk 6.2 on PostgreSQL 17, restarted after a reboot.
- A private admin on port 9000 and a public port that answers only subscriber-facing paths.
- Links in emails that point at https://<vm>.exe.xyz, not localhost.
- A test inbox that catches all mail until the owner connects SES, Postmark or Resend.
- Nightly backups of the database, uploads and secrets.
What's running, and where
https://my-listmonk.exe.xyz:9000/admin/
The listmonk admin and API, behind exe.dev login and listmonk's own
https://my-listmonk.exe.xyz:8025/
The Mailpit test inbox
https://my-listmonk.exe.xyz/subscription/form
Signup, opt-in, unsubscribe, archive, tracking and bounce webhooks, once you make the VM public
Deploy with Shelley#
Click Deploy and Shelley will set up listmonk on a new VM, then check that it works. No config-file wrangling required.
Prefer a terminal?
curl -fsSL \
  https://exe-staging.dev/deploy/listmonk/prompt.txt \
  | ssh exe.dev new --prompt=/dev/stdin
When it's done, run this on your computer (only you can):
ssh exe.dev share set-public my-listmonk # subscribers' unsubscribe and opt-in links need thisWhat Shelley is told
Set up listmonk on this VM by following the exe.dev recipe at https://exe-staging.dev/deploy/listmonk.md?via=deploy from top to bottom.

The recipe's example VM name is my-listmonk. This VM's name is the output of `hostname`: use it wherever the recipe writes my-listmonk. Skip the step that creates the VM; you are on it.

You are done when all of these are true. Check each one yourself:
- listmonk 6.2 on PostgreSQL 17, restarted after a reboot.
- A private admin on port 9000 and a public port that answers only subscriber-facing paths.
- Links in emails that point at https://<vm>.exe.xyz, not localhost.
- A test inbox that catches all mail until the owner connects SES, Postmark or Resend.
- Nightly backups of the database, uploads and secrets.

Read the whole recipe, including closed details, and follow "Install by
hand" first. The walkthrough before it is for the owner afterwards. Do
not run the Restore or Update instructions.
Work as exedev in ~/listmonk. Never overwrite an existing ~/listmonk/.env.
Do not connect an email provider, import subscribers or send campaigns:
the owner does that. Leave public sharing off; only the owner can turn it
on. Verify docker.service is enabled, the four containers are restart
unless-stopped and up (db and app healthy), localhost:9000/health
answers {"data":true}, localhost:8000/subscription/form returns 200, and
localhost:8000/admin/ and localhost:8000/api/lists return 404. Check the
backup timer is enabled and the first dump exists in ~/listmonk/backups.
Finish with the admin URL on port 9000, the user name admin and the
password from LISTMONK_ADMIN_PASSWORD in ~/listmonk/.env, the test inbox
URL on port 8025, and the command the owner runs on their own computer to
make subscriber pages public: ssh exe.dev share set-public my-listmonk

Finish with the URLs I should open and these commands, which only I can run, from my own computer (with this VM's name in them):
  ssh exe.dev share set-public my-listmonk   # subscribers' unsubscribe and opt-in links need this
Also at /deploy/listmonk/prompt.txt. The recipe it follows is /deploy/listmonk.md.
Sign in and send a test campaign#
Open the admin Shelley gives you, https://my-listmonk.exe.xyz:9000/admin/.
After exe.dev login you'll see listmonk's own sign-in page. The user is
admin; Shelley tells you the password, or read it on the VM with
grep ADMIN_PASSWORD ~/listmonk/.env.
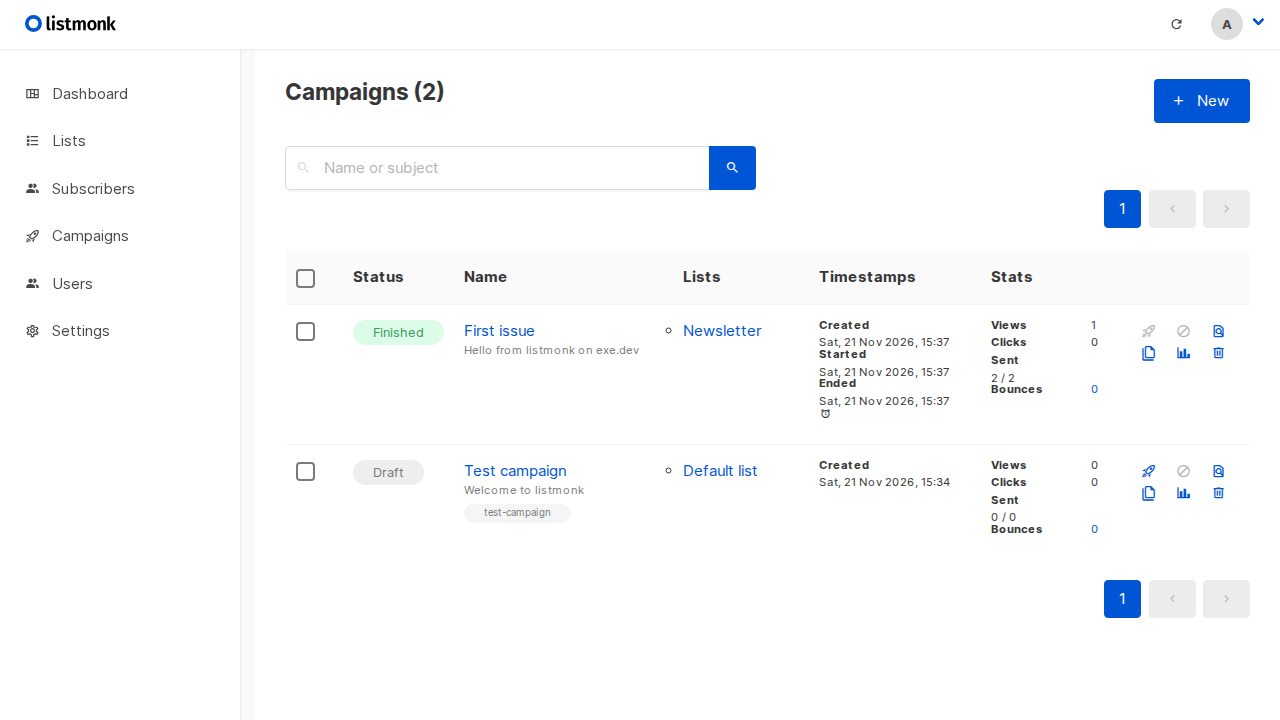
A fresh install has two sample lists, two sample subscribers and a draft Test campaign. Send it:
- Open Campaigns → All campaigns → Test campaign.
- Click Start campaign and confirm.
- Open the test inbox,
https://my-listmonk.exe.xyz:8025/. The "Welcome to listmonk" message tojohn@example.comis there.
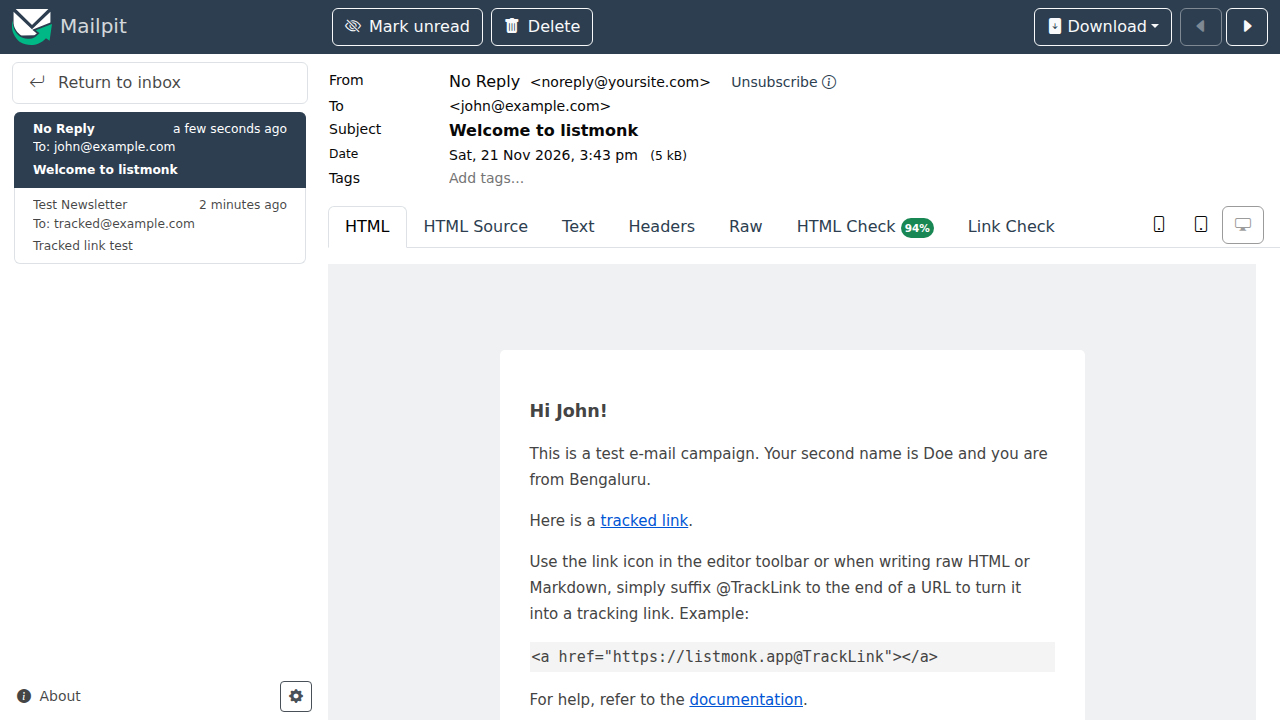
The links in that email start with https://my-listmonk.exe.xyz/, the
public address. Delete the sample subscribers and lists when you're done
(Subscribers, Lists), and change the admin password under your
avatar → Profile.
Make subscriber pages public#
Until now everything on the VM has been private, so an unsubscribe link would ask your subscribers to log in to exe.dev. On your computer:
ssh exe.dev share set-public my-listmonk
That opens port 8000 to everyone, and nothing else. The HTTPS proxy keeps ports 9000 and 8025 private, and the public proxy on 8000 forwards only these paths to listmonk:
| Path | What it is |
|---|---|
/subscription/… |
Signup form, double opt-in, unsubscribe and preferences, one-click unsubscribe |
/api/public/… |
Public lists, the subscribe API, the signup captcha |
/link/…, /campaign/… |
Click tracking, "view in browser" and the open-tracking pixel |
/archive, /archive.xml |
The public campaign archive and its RSS feed |
/public/…, /uploads/… |
Styles for those pages; images you put in campaigns |
/webhooks/service/… |
Bounce notifications from SES, Postmark and others |
Everything else, the admin, its login page and the API, is a 404 there. Check from your computer:
curl -sI https://my-listmonk.exe.xyz/subscription/form | head -1   # HTTP/2 200
curl -sI https://my-listmonk.exe.xyz/admin/ | head -1              # HTTP/2 404
Connect an email provider#
The VM doesn't send newsletters itself (see the FAQ); an email provider does, over authenticated SMTP on port 587. Pick one, verify your sending domain with it (it gives you SPF, DKIM and DMARC records to add at your DNS host), and create SMTP credentials.
| Provider | Host | Port, TLS | Username | Password |
|---|---|---|---|---|
| Amazon SES | email-smtp.<region>.amazonaws.com |
587, STARTTLS | SMTP username | SMTP password (not your AWS keys) |
| Postmark | smtp-broadcasts.postmarkapp.com |
587, STARTTLS | Server API token | Server API token |
| Resend | smtp.resend.com |
587, STARTTLS | resend |
An API key |
Then, in the listmonk admin:
- Settings → General → Default
fromemail: an address on your verified domain, likeYour Newsletter <news@example.com>. Save. - Settings → SMTP: in the first server, the one pointing at
mailpit, replace host, port, username and password with your provider's. Set Auth protocol toLOGINand TLS toSTARTTLS. For Postmark, click Set custom headers and enter[{"X-PM-Message-Stream": "broadcast"}](your broadcast stream's ID). Save. - Still under SMTP, enter your own address, click Test connection, and check your inbox.
New SES accounts start in the sandbox and can only mail verified addresses until AWS grants production access; Postmark and Resend review new accounts too. Match listmonk's sending speed to your provider's limit under Settings → Performance (Concurrency and Message rate).
The SMTP password is stored in listmonk's database on the VM, so keep the
backups private. When you no longer want the test inbox, stop it on the VM
with cd ~/listmonk && docker compose stop mailpit.
Tip
listmonk adds
List-Unsubscribeand one-clickList-Unsubscribe-Postheaders to every campaign (Settings → Privacy). Gmail and Yahoo expect both from bulk senders, along with SPF, DKIM and DMARC on your domain.
Add a signup form to your site#
In the admin, open Lists → Forms, tick the public lists the form
offers, and copy the HTML. It posts to
https://my-listmonk.exe.xyz/subscription/form, which is public. Paste
it into any page on any site. For a list with Opt-in: Double, listmonk
emails a confirmation link first; the subscriber is added once they click
it.
To keep bots out, turn on a captcha under Settings → Security; the
form code then includes the widget. A backend can also subscribe people
with a JSON POST to https://my-listmonk.exe.xyz/api/public/subscription,
with no credentials, as listmonk's
subscriber API docs show.
To use your own domain, like news.example.com, add a CNAME to
my-listmonk.exe.xyz, run ssh exe.dev domain add my-listmonk news.example.com
on your computer, and set Settings → General → Root URL to
https://news.example.com. See custom domains.
Leaving Mailchimp#
On November 19, 2026, Bending Spoons announced an agreement to buy Mailchimp from Intuit. The deal is expected to close in early 2027, and no changes to Mailchimp's plans or prices have been announced. If you'd rather own your list, here is how to move it.
1. Export your audience#
In Mailchimp, open Audience → All contacts, pick the audience, and click Export Audience (Mailchimp's help). You get a ZIP with one CSV per status: subscribed, unsubscribed, non-subscribed and cleaned (addresses that bounced). Repeat for each audience. For your past campaigns' HTML, Mailchimp's account export includes them.
2. Convert the files#
listmonk imports a CSV with email, name and attributes (JSON)
columns. mailchimp-to-listmonk.py
turns a Mailchimp export into that: first and last name become name;
your other merge fields, tags, and the opt-in and confirmation times (your
record of consent) go under attributes.mailchimp. Copy the unzipped
files to the VM (scp *.csv my-listmonk.exe.xyz:), then on the VM:
curl -fsSLO https://exe-staging.dev/deploy/listmonk/mailchimp-to-listmonk.py
python3 mailchimp-to-listmonk.py subscribed_*.csv > subscribers.csv
python3 mailchimp-to-listmonk.py unsubscribed_*.csv cleaned_*.csv > blocklist.csv
head -3 subscribers.csv
Copy both CSVs back to your computer
(scp my-listmonk.exe.xyz:'*.csv' .) to upload them in the browser.
Leave the non-subscribed file out: those are contacts who never opted
into marketing mail.
3. Import#
Create a list first (Lists → New; Single opt-in is fine, they already confirmed with Mailchimp). Then Subscribers → Import:
subscribers.csv: Mode Subscribe, Subscription status Confirmed, your new list. Import.blocklist.csv: Mode Blocklist. Import it second, so anyone who unsubscribed or bounced in Mailchimp is blocklisted even if they also appear in another audience's subscribed file.
listmonk never sends to blocklisted subscribers. A merge field becomes
{{ .Subscriber.Attribs.mailchimp.company }} in templates.
4. Rebuild the template#
In Campaigns → Templates, create a template from your Mailchimp
HTML. It must contain {{ template "content" . }} exactly once, where
each campaign's body goes. Swap the merge tags:
| Mailchimp | listmonk |
|---|---|
*|FNAME|*, *|LNAME|* |
{{ .Subscriber.FirstName }}, {{ .Subscriber.LastName }} |
*|EMAIL|* |
{{ .Subscriber.Email }} |
*|UNSUB|*, *|UPDATE_PROFILE|* |
{{ UnsubscribeURL }} |
*|ARCHIVE|* |
{{ MessageURL }} |
| Click tracking | https://example.com@TrackLink or {{ TrackLink "https://example.com" }} |
Mailchimp added your postal address to every footer; put it in your template's footer yourself, since anti-spam laws such as CAN-SPAM require it. More in listmonk's templating docs.
5. Send, then close Mailchimp#
Send the first campaign to a small list of your own addresses, check links and unsubscribe, then to everyone. Keep the Mailchimp ZIP files somewhere safe before you close the account.
Handle bounces#
listmonk counts bounces and blocklists hard-bouncing addresses (the defaults under Settings → Bounces). Turn on Enable bounce processing and Enable bounce webhooks, then connect your provider:
- Amazon SES: turn on Enable SES, and subscribe
https://my-listmonk.exe.xyz/webhooks/service/sesto an SNS topic that receives your domain's bounce and complaint notifications. listmonk confirms the subscription itself. Its bounce docs walk through the AWS console. - Postmark: turn on Enable Postmark, set a username and password,
and add a bounce webhook in Postmark for
https://my-listmonk.exe.xyz/webhooks/service/postmarkwith the same credentials as basic auth. - Resend isn't one of listmonk's built-in webhook sources. Resend
keeps its own suppression list; to record bounces in listmonk too, have
a script post them to the authenticated
/webhooks/bounceendpoint through the API, as below.
These paths are public, but listmonk checks each provider's signature or credentials before it records anything.
Use the API from scripts#
Everything in the admin is also a REST API on port 9000. A script on another machine needs two credentials: an exe.dev VM token to get past the proxy, and a listmonk API user.
-
In listmonk, Users → New user, type API, with a role that allows what the script does. Save and copy its token.
-
On your computer, make a token for this VM only:
ssh exe.dev ssh-key generate-api-key --vm=my-listmonk --label=listmonk-api -
Send the first in
X-Exedev-Authorization, which the proxy removes, and the second inAuthorization:curl -H "X-Exedev-Authorization: Bearer $EXE_VM_TOKEN" \ -H "Authorization: token api-user:$LISTMONK_TOKEN" \ https://my-listmonk.exe.xyz:9000/api/lists
The same headers work for imports, which suits big lists or a nightly sync from your app's database:
curl -H "X-Exedev-Authorization: Bearer $EXE_VM_TOKEN" \
     -H "Authorization: token api-user:$LISTMONK_TOKEN" \
     https://my-listmonk.exe.xyz:9000/api/import/subscribers \
     -F 'params={"mode":"subscribe","subscription_status":"confirmed","delim":",","lists":[3]}' \
     -F file=@subscribers.csv
Shelley on the VM needs neither token: it can call
http://localhost:9000/api/ with the API user alone. Ask it to "draft
next week's campaign from these notes" or "which links got the most
clicks last month?"
Share the admin#
The admin is private to you until you share the VM. On your computer:
ssh exe.dev share add my-listmonk alice@example.com
They sign in to exe.dev, then to listmonk with an account you create for them under Users. Users → User roles limits what they can do, and list roles limit which lists they see. See sharing.
Keep your list safe#
Your subscribers, campaigns and settings live in PostgreSQL in
~/listmonk/postgres, and campaign images in ~/listmonk/uploads. Every
night a database dump and an uploads archive go to ~/listmonk/backups,
with a copy of .env. Keep a copy off the VM. On your computer:
scp -r my-listmonk.exe.xyz:listmonk/backups listmonk-backups
The backups hold your subscribers' addresses and your provider credentials, so store them like a password. For a copy of the whole disk, see VM backups to your own S3 bucket (a preview feature).
The nuts and bolts#
These are Shelley's setup steps and your maintenance reference. Tested with listmonk 6.2.0, PostgreSQL 17.12, nginx 1.30 and Mailpit 1.34.0 on November 21, 2026.
Install by hand
Create a VM#
On your computer (pick another name if my-listmonk is taken):
ssh exe.dev new --name=my-listmonk
ssh my-listmonk.exe.xyz
The remaining commands run on the VM, as exedev.
Write the secrets#
The database password and the first admin's password. The file is created only once, so running this again keeps them:
sudo systemctl enable --now docker.service
mkdir -p ~/listmonk && cd ~/listmonk
if [ ! -f .env ]; then
  (umask 077; cat > .env <<EOF
POSTGRES_PASSWORD=$(openssl rand -hex 24)
LISTMONK_ADMIN_USER=admin
LISTMONK_ADMIN_PASSWORD=$(openssl rand -base64 18 | tr -d '/+=')
EOF
  )
fi
ls -l .env
ls shows -rw-------. Enabling docker.service makes the containers
come back after a reboot.
Start listmonk#
cd ~/listmonk
cat > compose.yaml <<'EOF'
name: listmonk
services:
  db:
    image: postgres:17-alpine
    restart: unless-stopped
    environment:
      POSTGRES_DB: listmonk
      POSTGRES_USER: listmonk
      POSTGRES_PASSWORD: ${POSTGRES_PASSWORD}
    volumes: ["./postgres:/var/lib/postgresql/data"]
    healthcheck:
      test: ["CMD-SHELL", "pg_isready -U listmonk -d listmonk"]
      interval: 5s
      retries: 20
  app:
    image: listmonk/listmonk:v6.2.0
    restart: unless-stopped
    # Create the schema on first start, migrate it after an upgrade, then run.
    command: [sh, -c, "./listmonk --install --idempotent --yes --config '' && ./listmonk --upgrade --yes --config '' && ./listmonk --config ''"]
    environment:
      LISTMONK_app__address: 0.0.0.0:9000
      LISTMONK_db__host: db
      LISTMONK_db__port: 5432
      LISTMONK_db__user: listmonk
      LISTMONK_db__password: ${POSTGRES_PASSWORD}
      LISTMONK_db__database: listmonk
      LISTMONK_db__ssl_mode: disable
      LISTMONK_ADMIN_USER: ${LISTMONK_ADMIN_USER}
      LISTMONK_ADMIN_PASSWORD: ${LISTMONK_ADMIN_PASSWORD}
      PUID: "1000"
      PGID: "1000"
      TZ: Etc/UTC
    ports: ["9000:9000"]
    volumes: ["./uploads:/listmonk/uploads"]
    depends_on:
      db: { condition: service_healthy }
    healthcheck:
      test: ["CMD-SHELL", "wget -qO- http://localhost:9000/health"]
      interval: 10s
      retries: 30
  public:
    image: nginx:stable-alpine
    restart: unless-stopped
    ports: ["8000:8000"]
    volumes: ["./public.conf:/etc/nginx/conf.d/default.conf:ro"]
    depends_on: [app]
  mailpit:
    image: axllent/mailpit:v1.34.0
    restart: unless-stopped
    ports: ["8025:8025"]
EOF

cat > public.conf <<'EOF'
server {
    listen 8000;
    access_log off;
    client_max_body_size 1m;
    resolver 127.0.0.11 valid=30s;
    set $listmonk http://app:9000;

    # exe.dev's proxy puts the visitor's address last in X-Forwarded-For.
    set_real_ip_from 0.0.0.0/0;
    set_real_ip_from ::/0;
    real_ip_header X-Forwarded-For;
    proxy_set_header Host $host;
    proxy_set_header X-Forwarded-For $remote_addr;
    proxy_set_header X-Forwarded-Proto https;

    # What subscribers and providers reach. Nothing else is public.
    location /subscription/ {          # signup, opt-in, unsubscribe, preferences
        limit_except GET POST { deny all; }
        proxy_pass $listmonk;
    }
    location /api/public/ {            # public lists, subscribe API, captcha
        limit_except GET POST { deny all; }
        proxy_pass $listmonk;
    }
    location /link/ {                  # click tracking
        limit_except GET { deny all; }
        proxy_pass $listmonk;
    }
    location /campaign/ {              # "view in browser" and the open pixel
        limit_except GET { deny all; }
        proxy_pass $listmonk;
    }
    location ~ ^/archive(\.xml|/.*)?$ {  # public archive and RSS
        limit_except GET { deny all; }
        proxy_pass $listmonk;
    }
    location /public/ {                # CSS and JS for those pages
        limit_except GET { deny all; }
        proxy_pass $listmonk;
    }
    location /uploads/ {               # images in campaigns
        limit_except GET { deny all; }
        proxy_pass $listmonk;
    }
    location /webhooks/service/ {      # bounce webhooks from SES, Postmark, ...
        limit_except POST { deny all; }
        proxy_pass $listmonk;
    }
    location = /robots.txt { proxy_pass $listmonk; }
    location = / { return 302 /subscription/form; }
    location / { return 404; }
}
EOF

docker compose up -d --wait --wait-timeout 300
All four services start; db and app report healthy. On first
start listmonk creates its tables, the admin user from .env, and the
sample lists and campaign.
Point links and mail at the right places#
listmonk builds every link in an email from its Root URL, which starts
as http://localhost:9000. Set it to the VM's public address, and point
the first SMTP server at the test inbox so nothing leaves the VM yet:
cd ~/listmonk
docker compose exec -T db psql -q -U listmonk -d listmonk <<SQL
UPDATE settings SET value = to_jsonb('https://$(hostname).exe.xyz'::text)
  WHERE key = 'app.root_url';
UPDATE settings SET value = jsonb_set(value, '{0}', (value->0) ||
  '{"enabled": true, "host": "mailpit", "port": 1025, "auth_protocol": "none",
    "tls_type": "none", "username": "", "password": ""}')
  WHERE key = 'smtp';
SQL
docker compose restart app
docker compose up -d --wait
docker compose ps
curl -fsS localhost:9000/health; echo
curl -s -o /dev/null -w 'subscription form %{http_code}\n' localhost:8000/subscription/form
curl -s -o /dev/null -w 'admin on the public port %{http_code}\n' localhost:8000/admin/
curl -s -o /dev/null -w 'API on the public port %{http_code}\n' localhost:8000/api/lists
printf 'Admin: https://%s.exe.xyz:9000/admin/\nTest inbox: https://%s.exe.xyz:8025/\n' "$(hostname)" "$(hostname)"
The checks print {"data":true}, subscription form 200,
admin on the public port 404 and API on the public port 404.
What the pieces do:
- The HTTPS proxy sends
https://my-listmonk.exe.xyz/to port 8000, and:9000and:8025to listmonk and Mailpit. Those two ports always need exe.dev login. - The public proxy on 8000 forwards only the subscriber-facing paths listed in Make subscriber pages public. The admin's login page and the API are a 404 there.
- Mailpit accepts any mail on port 1025 inside the Compose network and shows it on 8025. It keeps messages in memory, so a restart clears it.
Set up nightly backups#
pg_dump copies the database while listmonk keeps running. The script
checks each dump is readable, archives the uploads, and keeps two weeks:
cd ~/listmonk
cat > backup.sh <<'EOF'
#!/bin/sh
set -eu
umask 077
cd "$(dirname "$0")"
mkdir -p backups
stamp=$(date +%Y%m%d-%H%M%S)
out="backups/listmonk-$stamp.dump"
docker compose exec -T db pg_dump -U listmonk -d listmonk -Fc > "$out.tmp"
docker compose exec -T db pg_restore --list < "$out.tmp" > /dev/null
mv "$out.tmp" "$out"
tar -czf "backups/uploads-$stamp.tar.gz" uploads
cp .env backups/listmonk.env
find backups -name 'listmonk-*.dump' -mtime +14 -delete
find backups -name 'uploads-*.tar.gz' -mtime +14 -delete
EOF
chmod +x backup.sh

sudo tee /etc/systemd/system/listmonk-backup.service >/dev/null <<'EOF'
[Unit]
Description=Back up listmonk
After=docker.service

[Service]
Type=oneshot
User=exedev
ExecStart=/home/exedev/listmonk/backup.sh
EOF
sudo tee /etc/systemd/system/listmonk-backup.timer >/dev/null <<'EOF'
[Unit]
Description=Back up listmonk nightly

[Timer]
OnCalendar=daily
Persistent=true

[Install]
WantedBy=timers.target
EOF
sudo systemctl daemon-reload
sudo systemctl enable --now listmonk-backup.timer
sudo systemctl start listmonk-backup.service
systemctl list-timers listmonk-backup.timer
ls -l backups
The timer lists its next run, and backups holds a .dump, an
uploads-….tar.gz and listmonk.env. Now open the admin and follow the
walkthrough at the top.
Restore from a backup
On the VM, with the stack running. This replaces the database with the dump and puts the uploads back:
cd ~/listmonk
dump=$(ls -t backups/listmonk-*.dump | head -1)
uploads=$(ls -t backups/uploads-*.tar.gz | head -1)
docker compose stop app
docker compose exec -T db pg_restore -U listmonk -d listmonk --clean --if-exists < "$dump"
tar -xzf "$uploads"
docker compose start app
docker compose up -d --wait
On a new VM, run "Install by hand" first, copy backups/ over, and put
backups/listmonk.env back as .env before the first
docker compose up, so the database password matches. Then restore as
above. If the new VM has a different name, set Settings → General →
Root URL to its address.
Update
Read the release notes
first; listmonk's upgrade guide
has notes for major versions. Back up, change the image tag, and
restart. The --upgrade step in the Compose command migrates the
database on start:
cd ~/listmonk
./backup.sh
sed -i 's#listmonk/listmonk:v6.2.0#listmonk/listmonk:vX.Y.Z#' compose.yaml
docker compose pull
docker compose up -d --wait
docker compose logs app | grep -m1 -o 'v[0-9][^ ]*'
Replace vX.Y.Z with the new tag. To update PostgreSQL to a new major
version, dump, start a fresh postgres container on an empty data
directory, and restore; see our PostgreSQL recipe.
Troubleshooting
- Links in emails point to
localhost:9000. The Root URL wasn't set. Set Settings → General → Root URL tohttps://my-listmonk.exe.xyz(or your domain) and save. - Subscribers see an exe.dev login page when they unsubscribe. The
VM isn't public yet:
ssh exe.dev share set-public my-listmonk.ssh exe.dev share show my-listmonkshows the setting. - A public page is a 404. Only the paths in
public.confare public. If you changed the media upload URI or need another path, add alocationfor it and rundocker compose restart public. - Mail doesn't arrive. Settings → Logs in the admin shows SMTP
errors, as does
docker compose logs app. Check the provider's own activity log too: an unverifiedfromdomain and SES's sandbox are the usual causes. - Mail lands in spam. Check SPF, DKIM and DMARC for your sending
domain with your provider, and that the
fromaddress is on that domain. - Containers don't come back after a reboot.
systemctl is-enabled docker.servicemust sayenabled; runsudo systemctl enable --now docker.service. - Bounce webhooks don't register. Check that bounce processing and
webhooks are on under Settings → Bounces, and look for
bounceindocker compose logs app.
Frequently asked questions#
Is listmonk free?
Yes. listmonk is open source under the AGPL-3.0, with no limits on subscribers or sends. You pay for the VM (exe.dev plans) and for your email provider's sending, which SES, Postmark and Resend each price per email.
Can the VM send the mail itself, without SES or Postmark?
Don't. A new server's IP has no sending reputation, and receiving providers judge bulk mail harshly, so a provider that signs your domain with DKIM and handles complaints is the practical way to reach inboxes. exe.dev's own email sending is for notes to you and your team, not newsletters: it only delivers to people who have a relationship with the VM.
Which email provider should I use with listmonk?
Any SMTP provider that allows bulk or marketing mail. Amazon SES is the cheapest at volume and has a built-in listmonk bounce webhook; Postmark has a separate broadcast stream for newsletters and a webhook too; Resend is quick to set up. See Connect an email provider.
How do I move my list from Mailchimp to listmonk?
Export the audience as CSV, convert it with our small script, import subscribed contacts as confirmed and unsubscribed and cleaned ones as blocklisted, then rebuild your template. See Leaving Mailchimp.
Can I sign in to listmonk with my exe.dev login?
Not directly. listmonk has its own users and supports OpenID Connect, but it doesn't read the X-ExeDev-Email header. exe.dev login guards the admin port in front of it, so a stranger never reaches listmonk's login page at all.
Should I use listmonk v7?
Not yet. As of November 21, 2026, v7.0.0 is in beta (beta.2, November 10); v6.2.0 is the latest stable release and what this page pins. Update when v7 is final, after a backup; see Update.
How many subscribers can one VM handle?
listmonk is a single Go binary and is built for large lists; the whole stack used about 125 MB of memory at rest in our test. PostgreSQL grows with subscribers and campaign statistics; grow the disk with ssh exe.dev resize my-listmonk --disk=50GB. Your provider's sending rate is usually the real limit.
Published Nov 21, 2026 · Updated Nov 21, 2026 · tested end to end Nov 21, 2026 · Markdown · manifest.json · Something wrong? Tell us